Showing posts with label swatching. Show all posts

Jun 4, 2007

Sunflower Cami - back to work!

Hey there, remember me? :) My most recent CAL post was two months ago - I didn't realize it had been so long! But in between, I wrote my Masters thesis, and I hardly knit at all during that time period.

I've picked up the sunflower cami again though, and I'm really excited about it! Before my hiatus, I made a swatch and found that I really liked the fabric created by Calmer knit at 5.5 stitches per inch. (Just a little reminder - always write down what size needle you swatch with! Otherwise you might think you knit your swatch on 8s when you actually used 7s and then you will wonder why the 3" that you've knit so far look gigantic.) I decided to knit the front first and use it as a general template to find the optimal placement of the flower on the back -- which meant that I had to figure out the neckline.

My first thought was to give the sweater a really deep V, where the point would hit around the bra band. This neckline seems trendy right now and I think it would be flattering to a variety of body types. However, such a low V requires a plain camisole underneath, and Calmer is so soft that I wanted to be able to wear it right next to my skin. I considered a higher V but it struck me as a little boring - been there, done that! The back of the shirt will provide a strong visual impact and the front should be just as striking without taking over the spotlight.

After a few more sketches and swatches, I decided on a deep keyhole neckline with a frog closure at the top.

sketch for front of sunflower cami

I think that this will work really well with the back - it's clean but it's interesting. (And sexy!) I'm going to finish the neckline and armholes with applied i-cord, and I'll probably reinforce the sides of the keyhole somehow so the fabric doesn't stretch too much at the closure point. I am still up in the air about the bottom edge, so I borrowed Marnie's technique of starting with a provisional cast-on, as you can see here:

front of sunflower cami

I sort of want to put a leafy lace edging along the bottom to go with the flower but I'm worried it might be too busy. When I get to that point, I will probably swatch and see. Otherwise, I could finish the bottom with more applied i-cord or a little ribbing.

As for the back, I think I've finalized my sunflower design! Here is half of it (again with a provisional cast-on):

half-sunflower swatch

It's a circle inside, a hexagon outside, and the proportions resemble a sunflower. Perfect!

Mar 26, 2007

Splendour Sketch and Swatch

I started on my Kidsilk Haze "top down" sweater. I am using the bright magenta color, which is called Splendour. I think Splendour would be a splendid name for my sweater. I have a rough sketch of Splendour as well as a swatch (in little arrowhead). My design concept was to do a top down sweater with some sort of lace yoke in a single strand. The body would be double stranded in stockinette stitch. Right now I am trying to find a lace stitch pattern that would meet the following criteria:
1) Small number of stitch repeats (in case I want to design the sweater for multiple sizes).
2) Small number of row repeats (again in case I want to design multiple sizes).
3) Gauge of lace is equal to gauge of double stranded stockinette stitch (I want to be able to knit the entire sweater using the same needle just dropping a strand in the front).
4) The stitch pattern looks fine knit from top to bottom.

The little arrowhead lace may meet all these criteria, but I am not sure if it looks good single stranded? I wonder if I need a pattern with better stitch definition?

I also wonder if I need to have some sort of border between the stockinette stitch and the lace? I plan to cast on with a double strand work some short rows for the shoulders and then change to the lace pattern. Should I work a row of garter stitch to give the lace yoke more delineation?

Splendour Sketch
Splendour Sketch

Little Arrowhead Swatch

Mar 21, 2007

PEACE Cardigan


I am having trouble up-loading the sketch, so as soon as I can figure out how to get this done--i will have a sketch of my design.
Three Swatches 10, 9, 7 needle. I went with the 9 needle for the
Puff Ribbing Pattern 1-Multiple of 6sts + 3.
K3W-knit 3 sts wrapping yarn twice around needle for each st.
1st Row: (wrong side) P3, *K3W, P3*
2nd Row: K3, *P3, (dropping extra loops), K3*
It's EASY to remember and a fun stitch to work and it looks totally different with each yarn you work in with. I love this Stitch Pattern and I want to use it for everything now (I'm like that). I am not sure what I am doing for the bottom part of the sweater-I think the Stockinette Stitch. The top is going to have a knit lining in a contrasting color of Rowan Kid Silk Haze.
I am 3/4 of the way finished on the Front.

Mar 11, 2007

A belated introduction

My name is Sachi and I'm here to learn.

I'm a knitter and a spinner. I've played with dyeing and I've created simple knits. I have yet to design a garment of any significant size, mainly because I personally am of fairly significant size. As a larger woman, who has yet to learn much in the way of patience, creating a sweater that fits me and having it end in less-than-perfection is far too much to bear at the moment. Not only that, but the thought of having to rip something of that huge size is just so daunting that it makes me want to take a nap.

But I'm learning patience and the concept of math/gauge/ease/fit are starting to take a proper hold in my mind. My first sweater of my own design is getting closer every day. I look forward to absorbing information and inspiration from all you lovely folks here at the Create Along. While I may not have much to contribute to this group in the way of new and exciting design for quite some time, I thank you in advance for sharing your creativity with the world.

I've received my shipment of Denim and sat down with my stitch pattern books for hours... and hours... I've been sketching madly for several days and, after narrowing my project down to three sketches, I've decided on a tank with some dragon-scaley-type design. Oh boy. I'm in for a ride, I think.

My mind has only recently been able to absorb fully the concept of gauge swatch shrinking or blooming making my work-in-progress larger than my finished object will be. In fact, my mind has not fully wrapped around that concept, now that I think of it. I swatched, I washed, I dried. I did not, however, measure the unwashed swatch which will be yet another thing to add to my list of "lessons learned" as I work my way through this project. You see, had I measured my unwashed swatch, I would have an awful lot more confidence in my project, now only one pattern-repeat deep in progress.

While my finished project must fit a 44" in bust, my waist certainly does not require such a size. However, as I was scribbling down notes and calculating stitch counts, I understood that, unless I'm inserting a button band, I'll need to be able to pull the tank OVER a 44" bust. As I plan to knit this tank in two pieces, I figured I'd need at least a 20" - 22" piece; half the finished size. I calculated. I cast on. I knitted. I freaked out.

This WIP is at least 35" wide, relaxed. I need a new mantra to chant as I knit to help me fight the urge to rip; something to remind me to trust my swatch.

"Om... Understand the swatch... Om... become the swatch... Om... be the swatch... "

It's not working.

Mar 10, 2007

Liz K's Introduction

It has taken me some time to clear out some projects in the queue, but I have begun my design project for the Create-Along. I have been so inspired by this idea and by the incredible ideas bouncing around here!

I am definitely growing into designing. I tend to be more of a radical modifier of patterns than creating something completely from scratch, switching out a neckline, totally changing an edging treatment, or combining two patterns into one garment. In previous attempts at design, I have gotten bogged down in math calculations and picky details, so I have learned to get projects on the needles and design from there.

Using the CAL's limitations, and my own desire to knit from stash, I am making a lacy camisole/tank for my 6 year old daughter, to wear as a layering piece over other cotton tanks, knit with Denim. I have lots of smallish quantities of leftover cottons in my stash, and love the idea of coming up with a sort of tank-template for her, with the idea of switching out lace patterns, bodice shapes or strap treatments as the inspiration hits. You know, design something to radically modify!

I began with my Stitch Pattern-A-Day Calendar, and quickly settled on using Fishtail Lace as the main design element. The big question was choosing a needle size, since I wanted the tank to be lacy enough for her under-tank to peek out of the holes without having that macrame plant holder look. This is always an added challenge in Denim, since the fabric can change quite drastically once washed. In anticipation of copious swatching, I purchased an extra ball of Rowan Denim and started with a US8 needle, knitted a swatch, then washed and dried it.


The plan is to knit several repeats of the lace for the bottom of the tank, and then transition into a mostly stockinette bodice, with two lace panels that will then transition into i-cord straps.


Miraculously, I was pleased with the fabric it created, and am ready to begin knitting on the actual piece. It may be a week or so before I make any further progress on the piece, as I am furiously trying to finish my wool Central Park Hoodie before the weather gets too warm to wear it!

Not exactly x-posted at Crossroad Knits.

Mar 8, 2007

Swatchfest '07

So I think I've picked a lace pattern for the body of my cardigan. And, as so often happens, it's not only not what I was picturing and planning, it's something that I'm sort of surprised even appeals to me.

My original plan was something along this (Arrowhead Lace from BW1): open and geometric and clean-lined and an interesting foil to the curvy, voluptuous cables that will make up the yoke.
2006_0511swatch0015

It's just wrong. Wrong, wrong, wrong. And I hate it. I do want a functional cardigan, after all, and something this open on my arms and body isn't going to work for me. So I went back to my stitch dictionaries, feeling like a particularly bratty Goldilocks: this pattern is too big, this one is too small, too pictorial, too abstract, too open, too vertical, too diagonal, too flowerly, too geometric, too boring, too elaborate. Nothing was right. Nothing was ever going to be right.

I despaired.

But then I realized that every time I flipped through the books, I stopped briefly at the Lucina Shell Pattern (BW2) and figured there was no harm in swatching it up. And I really kind of love it. It's fun to knit—you increase on each side of the shell parts for several rows and then decrease them all at once later. The pattern calls for knitting four stitches together through the back loops, then knitting four stitches together. The k4tog isn't bad, but the k4togtbl is really almost impossible to pull off when the yarn is this inelastic. You can see how much it stretches the stitches out in the bottom right shell, where it comes together at the top. I switched to slipping two stitches together, knitting two together and slipping the slipped stitches over. It's still a left-leaning decrease, but much easier to execute and looks just as good, if not better.
2006_0511swatch0020

The real test, though, is whether the pattern will look good with the cables. I had knit up a small cable swatch so I could lay it out with all of the patterns I'm considering. I thought I'd be considering a lot more.
2006_0511swatch0019
I'll have to play around with the numbers and how many purl stitches go between them, but I should be able to make the cables grow more or less organically out of the shells. The pretty edge is a bonus; it'll look good at the lower edge and at the cuffs. Since the fabric is so solid, I don't think I need a cable band at the wrists to balance the yoke. And one thing that's super-nice is that since one of the patterns has garter stitch in it, I can do a garter stitch buttonband without it looking like it came from outer space.

Now I need to figure out gauge and sizing. I'll have time this weekend to sit down with scrap paper and a calculator and work it all out. One roommate is out of town, the other is mega-booked and I have a fabulous weekend ahead of me, neatly balanced between social and crafty. It's about time; I've honestly believed it was Friday literally every day this week — to the point where I sent a co-worker an email this morning saying how weird it is that the book launch party we're going to tonight is being held on a Friday since they're always on weeknights.

Mar 5, 2007

On sunflowers, swatching, and sanity (or the loss thereof)

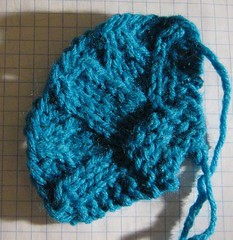
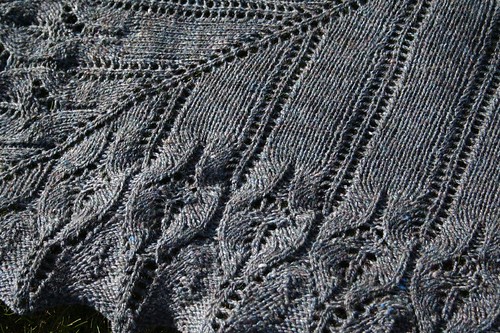
While I wait for my Calmer to arrive (I went with Slosh, a dark slatey blue - at least according to my monitor), I've started to plot out my idea. My inspiration comes from a washcloth that I knit a while back:

Yvonne's Double Flower Washcloth

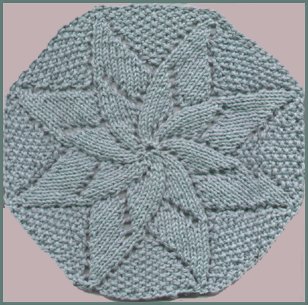
That's the pattern picture, not my own version, but mine looked very similar. As I worked on it, I thought, "wouldn't this look great plastered onto the back of a cami?"

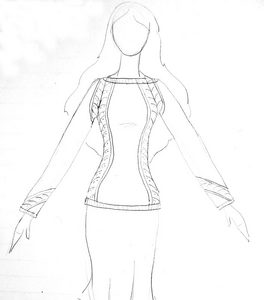
And so an idea was born. The washcloth is knit from the inside-out, and I've seen some sweater patterns that start as circles and grow out from there, but most of them are shrugs or cardigans, meant to be loose-fitting. What I want is a close-fitting top, where all the shaping is carefully planned and defined, and I don't think this would be possible if I knit the whole thing starting from a point and working outwards.

My next thought was that I could knit the cami in a standard, bottom-to-top manner, and leave an octagonal hole. Then I could knit the washcloth separately and seam it in. This would probably work, but the seaming could be tricky. I don't like tricky seams. Instead, I thought, I could leave the same octagonal hole, then pick up stitches all around the perimeter, and work the washcloth pattern from the outside-in.

sketch of back of cami for CAL project

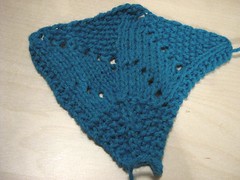
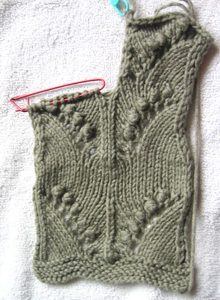
This would require me to invert the pattern. I'm not sure why I thought it would be a piece of cake, but... really, not so much. I started by charting it as written. Then, as a first attempt, I rotated it 180 degrees, replaced all the decreases with yarnovers, and replaced the yarnovers with decreases, using left-slanting or right-slanting ones according to what looked correct on the chart. I resolved a minor issue of having to add additional "no stitch" boxes, and then I knit 2 wedges using some cheap acrylic. (I like to do technique swatches in scrap yarn, and save my good yarn for swatches relating to gauge, stitch definition, drape, etc.)

first swatch

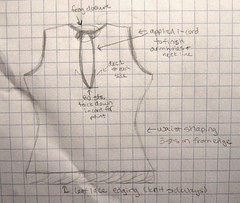
It's not bad, but there are quite a few things I'm not happy about here. (I added notes through Flickr, so if you click on the swatch picture, it will take you to the Flickr page and you can see my comments in more detail.) That's when the danger started. The more I looked at the original washcloth pattern, the more I realized that I wouldn't be happy merely with working it backwards. I imagined that the double flower resembled a sunflower, and wondered how I could make it more sunflower-esque. The simplest modification was to work the center circle in seed stitch to represent the seeds of the flower. (Seeds in seed stitch! Awesome!) The other modification I wanted to make was to separate the inner flower from the outer flower a little bit more; in the original, the inner flower is exactly the same shape as the outer one, only smaller. I wanted to reverse the swirly curve of the inner flower. Here's a bad sketch:

sketch: idea for flower modifications

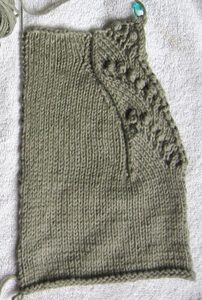
So I made swatch #2. Looking at it now, I guess I hadn't tried to flip the inner flower around yet. That came later.

second swatch

At this point, I started to get incredibly frustrated. All my good ideas seemed doomed to failure. Nothing wanted to line up the way I planned. I made one more attempt; I changed the outer triangles from seed stitch to stockinette, and I changed the seeds to reverse stockinette. (It made me very sad to not use seed stitch for the seeds, but it's nearly impossible to hide all those decreases in seed stitch.)

third swatch

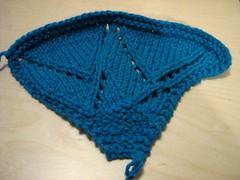
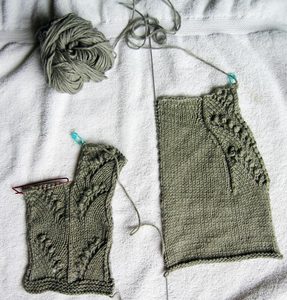
Getting better... but still not great. I didn't like the line running along the left of the outer petal that continued down to the flower's center. Also, I noticed that through all my modifications, I had lost the swirly nature of the original washcloth; all my lines seemed to have straightened out, and it looked more like a bunch of triangles than a flower. I went from frustrated to downright angry. I came close to tearing up my notes, cutting my swatches into shreds (remember, cheap acrylic), and abandoning the idea entirely. In a last-ditch effort, I turned to Google, to see if something similar had been done before. I couldn't find a single flower knit from the outside-in - perhaps that should have been a sign - but I did come across this:

snowflake from Berroco

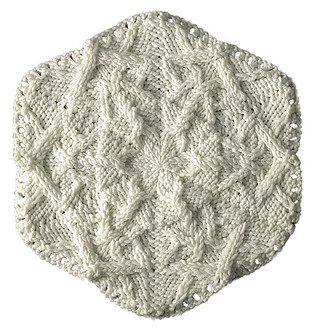
It's a snowflake that's knit from the outside-in, and it uses cables for texture. Cables! Brilliant!

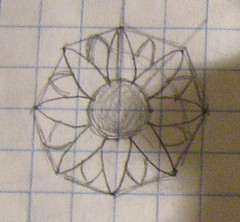
I realized that I had become much more attached to the sunflower concept than I was to the swirly lace washcloth, so I studied some pictures of the flowers, tried to shove the washcloth pattern completely out of my mind, and made this sketch:

sketch of sunflower

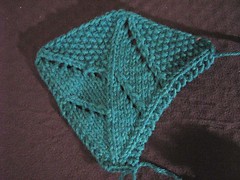
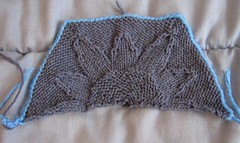
Using a combination of cables and decreases for shaping, I made a scaled-down swatch. I was downright sick of swatching (and if I never see turquoise acrylic again, it will be too soon) so not only is this not a full circle, but it also is much shorter than the actual flower on the cami would be.

fourth (and final for now!) swatch

Ladies and gentlemen... or only ladies, as the case may be... we have a winner!!

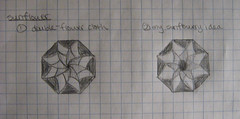
I'm not quite done with it yet; given the angular spread of this swatch, I think I might have to turn my octagon into a hexagon and switch from eight large petals to six. Also, each petal here produces its own point, so with 6 of them, I'd have 12 points total, and I don't relish the idea of planning a 12-sided hole. I might be able to block it to a 6-sided shape, or maybe I can slip the small-petal stitches on the first round? I haven't figured that out definitively yet, but I'll keep working on it while I wait for my Calmer.

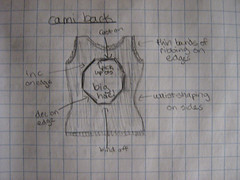
I'm calling this my Sunflower Cami, for obvious reasons. And please, please, don't ask me what the front is going to look like yet. I will probably break down in tears and throw something at you.

(Kidding! Mostly.)

Mar 4, 2007

The perfect T-shirt

I've had a favorite t-shirt for about the last, oh, ten years or so. I bought it in Portland, Oregon at a vintage clothing store in about 1997. It's so old, thin, and holey that it's reserved only for a sleep shirt.

(I would wear it, but it's just a leeeeee-tle too sheer from years of washing.) Basically, what I like about it is the modest scoop neck, the cap sleeves, and the mid-hip length. For my Create Along project, I'm going to try to replicate the shirt's cut, but incorporate an interesting textured pattern. Using Barbara Walker's Treasury of Knitting Patterns, I found and swatched the Grecian Plait Stitch in some Calmer that I'm using for another project.


At the bottom of the swatch it's the normal pattern, then a variation on top. The variation has a nice criss-crossy look to it, and I think I like it!

I plan on ordering some Classic Elite Premiere this week and swatching that to see if I still like the pattern. And in the meantime, I need to start sketching for my first ever design, which I'm calling the Roadrunner in honor of the cute little bird on the original shirt.

Mar 3, 2007

boring...


Bit of a boring post - finally got around to swatching tonight. Since the pattern my sweater will be (loosely) based on is called "Hike," I'm contemplating the name "Hack" or "Hiked" for mine. I think I'll have to buy a big long needle or two before actually starting, but I'm excited about this project. I think this sweater will be nice and light, perfect for three seasons out of the year. Until next time....

Mar 1, 2007


I received my Calmer in the mail and I started swatching right away. I couldn't wait. I already knew what lace pattern I wanted to use. It is one I have used before and I really love the look of it. I used US 4 needles because I wanted a tighter knit. My swatch came out exactly as I was hoping it would.

I will most likely try swatching the lace pattern on size 5 or 6 needles also to see how it affects the pattern. So far, however, I do like how it looks.

I am a terrible sketch artist. My first idea for Calmer was to make a skirt. I have knit so many tops that I am ready for a change. My thoughts are that it would be a slight A-line skirt but I also want to add a bit of a flair at the bottom where the lace portion is. Not much of a flair, but just a tad. I want it to hit an inch or two above the knee.

After I made the swatch I kept thinking a really neat top could be made also so I sketched those out as well. However, I really think I am going to stick to my original idea of knitting a skirt. It is a bit more appealing to me at this time.

So now, I need to get to get going on the measurements and the math that goes with it! I will work on that this weekend when I have a bit more time.

Feb 22, 2007

I HAD TO LAUGH

At myself, that is. I say Color is my thing and I use Black. If the truth be told I have 6 balls of black in my stash and 3 balls of the green and wanted to use them. I did my first swatch last night and it is being blocked. I used an 8 needle I like the fact that it will have a good drape because of the elasticity of Calmer. I haven't knitted with black in about 10 years-and it has been all about color for me, so I have to get use to it. I will post the swatch when it dries.

Feb 21, 2007

Swatching and sketching Lily

I love Calmer to pieces. It is the same yarn I used for my Deciduous pattern, so swatching would not be so much about determining gauge and best needle choice (though it never hurts to double check.) Instead, this would be a matter of deciding how different stitches would look in the yarn.

Like Julia, the process of coming to a design is fluid for me. I may start with a stitch I like, or a yarn, or even a color. The process of starting is usually a mix of sketching, looking through "inspiration" images I have around, and swatching. In this case, I decided I wanted to do something with a stitch pattern that could easily be split in two, to diverge around the armsceye. The pattern would run up the sides of the garment and would pick up again along with the sleeve cap, so that it would look, basically, continuous.

I finally decided that the Lily of the Valley stitch pattern, in one of my Barbara Walker books would work just fine.


I charted three different versions of the lace. It's a simple enough pattern that, at this stage, a chart is sufficient to see how the lace will be effected by the changes. I've highlighted the stitches that changed from iteration to iteration. I first split the double decrease into paired decreases, but I didn't want to have to seam the sleeve into the armsceye, through the double decrease. Since there is already a column of purl stitches on the outside, I thought that maybe two purls in the center would look nice. Finally, I removed the extra knit stitches on either side of the center decreases, because I didn't want the motif to get too wide.

The results is that up the sides of the garment, where the motif is intact, the purl stitches would close up, leaving what looked like a seam, along the armsceye, it would leave me a place to seam.

On to the swatching.

First I decided to knit the newly charted lace. Then I split the lace, knit that for a couple repeats and played around with the swatch to see how the lace would look as it curved around an edge. I was happy with the results, bound them off, but did not cut the yarn.

I cast on a new swatch, keeping the original swatch attached, with a locking stitch marker in the last stitch, to keep the piece from unraveling.

This second swatch was specifically to determine gauge and to play around with the decreases. I had to decide if my full fashioned decreases would happen by working the outermost purl stitch with one adjacent knit stitch or whether I'd work the decreases right after the purl columns, utilizing two knit stitches. I decided that I didn't want any glaring indicating that I had worked a decrease so I chose the former option. When stretched out, the knit decreases looked better, but I wanted this piece to have a slim fit but not so tight that the purl stitches would actually show, so the stealth decrease won out.

After knitting everything, I washed and blocked my swatches, still keeping them attached to the ball and to each other.


I have more than enough yarn to complete the project, but I still never like to cut yarn just for a swatch. Sometimes, you just have to cut. For instance, if you are going to work in Rowan Denim, you will really need to send your yarn through the wash to check the gauge and you can't do that if it's attached to 30 grams of unknit yarn. However, if you are just going to hand wash your piece and you don't expect the yarn to change drastically in the process, leaving it attached should not be a problem, and if you find yourself a little short for yarn near the end of the project, you can cannibalized your swatch for the extra needed yardage.

All while I'm swatching, I'm thinking about how I want to knit the piece. In fact, there's really no point during the designing and knitting of a piece that I won't diverge down another path if the mood suits me. However, in the interest of trying to document the whole process, this is the current state of my grand scheme.


This is how I envision the final piece. It'll be a pull over with a boat neck and shaping at the waist. The sleeves will be raglan style to allow the lace to angle gently. I figured a set in sleeve would require the lace to diverge too severely and wouldn't look good. And of course, the piece will be named, "Lily."

Now that I have my gauge and my vision, I can begin to plot out the actual pattern.

I like to set up a grid to the same scale as my gauge in Adobe Illustrator, and graph out every stitch. This, obviously, is the body. The piece will be identical in back and in front. I'll start plotting the sleeves later, but for now, this gives me enough info to start knitting.

Feb 20, 2007

Designing: Where I Start


Yarn speaks to me. When I see a beautiful fiber that I want, my little gears start clicking and I begin to think about what that yarn is most suited to become. I just have a general concept at this point, usually along the lines of a silhouette. When I first touched Classic Elite Premiere, which is a 50/50 tencel/pima cotton blend, it was so silky and smooth that I immediately felt it needed to be made into something with long, elegant lines and drape, and I decided on a shell that I could wear to work or out to dinner, but that could also be dressed down with some dark denim jeans. I bought 5 skeins in a light buttery color. (The camera I used does not properly capture the color - my kingdom for my Exilim, which is still in the repair shop!) I felt that the shell should be fitted and just barely clinging, but not tight, and I wanted a lace pattern that I could insert in an elegant vertical line, off-center.

With these general thoughts in mind, I went on to my common second step - browsing through my stitch dictionaries. Stitch dictionaries are wonderful, because each time I open one with a specific project in mind, I see something new. Stitch patterns that may not speak to me in one fiber work brilliantly in another. Just changing the yarn that I start with can give me wildly different results, which is fascinating to me - inspirational and fun. I started with Barbara Walker and almost immediately found what I felt would be the "right" lace. Then I went on to my usual third step - swatching.

If you don't own a stitch dictionary and want one, the 365 Knitting Stitches Calendar is an excellent and really economical way to go. Public libraries also often have several that you can browse through, and the libraries are licensed to allow you to make limited copies of pages for personal use. Alternately, you can browse through books or magazines of patterns that you like and take stitch patterns from those. My first scarf incorporated a cable that I saw on a sweater in Vogue.


Sometimes when I begin to swatch I hit the right stitch pattern or combination of patterns right away, and this was one of those times. As soon as I had a repeat finished, I knew that this was the lace I wanted to use, so I continued it for another repeat to make a very large swatch. I think the final dimensions are about five by seven inches. Other times I need to go through several different patterns to find the one(s) that will work. I will often do this on one large continual swatch with the patterns separated by a few rows of stockinette with a garter-ridge line as a boundary between designs, as pictured in the swatch in my last create-along post. It really just depends on how long it takes me to hit upon a pattern that I'm sure of. Regardless, I always make a larger swatch with a representative percentage of the patterns I plan to use, so that I can see how they work together.

If, as here, stockinette is an element of the design, I make a point of putting in a fair amount of it as well, so that I have a good idea of what the gauge will be in both the pattern and in stockinette. I take gauge before blocking, and gauge after blocking, and I make sure to wash and block the swatch as I plan to block the garment. After taking gauge, I weigh the swatch on my kitchen scale to determine how many grams of yarn are needed per square inch, and then I convert that number to yards per square inch. I then put all the information about yarn, needle size, gauge, and swatch weight in a moleskein notebook that I keep for design ideas, so that I can use the numbers later to ensure that I have the amount of yarn I will need to finish my project.

Now that I have my swatch and measurements done, I'm off and running. My next step will be to start sketching....