Showing posts with label calmer. Show all posts

Jan 27, 2008

Calmer and calmer.... thank you knitting

Looking back at earlier posts that I made I came across an idea that got tossed to the side. The footie pyjamas. In all the chaos of the previous year I completely forgot. I think I might order up some Calmer and give it a whirl. The dress didn't take very long (once I took a deep breath and let the knitting do it's "thang") and I'm hoping I'll find the same of the footies. "G" has already outgrown the dress. I might make her another, but this time modify the neckline to bring it in a little more because it had a tendency to fall off her shoulders (a little too cheeky for a five year old). The footies will be for my boy. He recently outgrew his last pair of footies and cried for several hours because he couldn't wear them (he's tactile and falls in love with his clothes and blankie..... he's my Linus). It's near impossible to find footies in sizes larger then 3T so if you can't find it, then make it. How much longer is the create a long going for? Is it indefinite? Either way I hope I can get the footies done before the time out.

Aug 3, 2007

Indigo Flowers, in Bloom

Cross-posted from my blog.
Click to read about Indigo Flowers I, II, III, 3.5, and IV.

My dear friends, welcome to the show! Here, I give you Indigo Flowers , undergoing metamorphosis (blocking, that is):


Can you see how joyful the lace is, relaxing in a basin of tepid water?

A dollop of rose-scented conditioner leaves a lingering sweet scent on the vest. I know, I should have used orchid or lavender to match the mood of the vest, but I always find rose irresistible.


As you can see, the neckline is finished with a few rows of garter stitches and THE bind-off method. Initially I also worked two rounds of seed stitches at the sleeve openings, but Calmer had its own mind (elastic cotton, what can you do), so I ripped them out in the end.

Here are a couple of peeks:


Ah and I must show you the asymmetrical element I incorporated into the vest. Look at the left side, and ignore the marker thread please:


It's been so long since I first conceived the design--two and a half months to be accurate. Like many of my fellow designers here, I changed quite a few design elements on the way, so I am more than pleased to see that the original idea has come through (has it ;-)?) in the finished garment. Invaluable suggestions and opinions from fellow CALers, friends and readers have helped me out of several crucial problems, and your encouragements and reminders(!) have kept Indigo Flowers alive ;-). Thank you!

--Iris

Jul 28, 2007

Indigo Flowers IV

Cross-posted from my blog.

Earlier this week, I dug Indigo Flowers (not yet forgotten!) out of my stash and resumed the work. What really surprised me was that the flowers literally flew off the needles--must have been due to the training that I got from the complicated laces!

Here's the back--aren't the ripples and wavelets lovely? And, is it quite different from what you have expected? Not so wild, not so bold…


I actually stopped at six rows before the bind-off row so I still have a chance to tweak the neckline a bit. Once again there's a dilemma. On one hand, the wavy neckline should get fixed. On the other hand, a fancy collar won't work since the vest is supposed to have a simple cut. The fact that it will be paired up with a shirt/blouse should be considered as well. What do you think? Shall I finish the vest with a few lines of garter stitches along the back and the front neckline and let them fall back leisurely, or shall I do an I-cord bind-off?

With Indigo Flowers sitting quietly aside, I picked up my tiny little lace needles--oh how am I obsessed--to cast on a few stitches with my new favorite yarn (THE silk). Yup I am trying a new design, no I have not figured it out completely yet, but that's why we like knitting and designing so much ;-), correct?

Finally, having seen how beautiful this (Non-)Pencil Sketch had turned out to be, I thought it might be a good idea to modify the pattern and expand the size range--I just need a little more time!

Jun 27, 2007

Indigo Flowers Sketch--Suggestions?

Cross-posted from my blog.
First of all, thank you my friends for all the wonderful comments on my progress, I feel greatly encouraged. Marnie, thanks for the detailed instructions on doing a great edging; I have that book but did not pay much attention ;-)! Phoenix and Hattie, thank you for your suggestions (I love beads, too).
I suddenly remembered that I haven't done a pen-and-ink sketch for Indigo Flowers Vest yet. How can a design be a design without a line sketch? So here it is: a one minute sketch.

You see, I have finished the front pieces, but haven't started the back yet. Once again I face a dilemma. This time it's about the ratio between lace and solid Stockinette stitches.

As typed on the sketch, the dark hatches represent Calmer and the wavy lines Zephyr.

Which one do you like ;-)?


Jun 25, 2007

Indigo Flowers III

Cross-posted from my blog; click to read about Indigo Flowers and Indigo Flowers II.


These flowers have been on and off needles for sometime now, and when they are on the needles, I love how they grow (albeit slowly). Both yarns (Calmer and Zephyr) are smooth and soft, and I have yet to get tired of the cool colors. Good signs! I surely hope that this vest would become a wardrobe staple for me. Well, although there were a few moments that I had to pause and double-check my decreases and see on which row I was at, it took me less time to finish the second half front piece.

Now both front pieces are waiting for three-needle bind-off ;-):


Looking at the neckline, I frowned a bit and decided that some finishing touches might be necessary. I did not expect to get this irregular neckline, but hey, it's lace and lace is supposed to be wavy!

Now this problem directly leads me to another one: the back neckline would be wavy, too--vertical ripples will appear. My current plan is to finish it with a few rows of garter stitches. Or maybe I can add a ton of beads along the neckline?

Oh and I almost forgot to say that the two lace panels are not mirror-imaged. I thought about that before casting on the second half. Then I decided to make them identical, because:
1. It is easier to keep track of the shaping.
2. When sewing with a print fabric which has a very small pattern repeat (6 X 6 sts here), few people would try to match the pattern precisely. It's simply unnoticeable.


That's all for now. Maybe my next post will be the last for Indigo Flowers--stay tuned and happy knitting!

Iris

Jun 4, 2007

Sunflower Cami - back to work!

Hey there, remember me? :) My most recent CAL post was two months ago - I didn't realize it had been so long! But in between, I wrote my Masters thesis, and I hardly knit at all during that time period.

I've picked up the sunflower cami again though, and I'm really excited about it! Before my hiatus, I made a swatch and found that I really liked the fabric created by Calmer knit at 5.5 stitches per inch. (Just a little reminder - always write down what size needle you swatch with! Otherwise you might think you knit your swatch on 8s when you actually used 7s and then you will wonder why the 3" that you've knit so far look gigantic.) I decided to knit the front first and use it as a general template to find the optimal placement of the flower on the back -- which meant that I had to figure out the neckline.

My first thought was to give the sweater a really deep V, where the point would hit around the bra band. This neckline seems trendy right now and I think it would be flattering to a variety of body types. However, such a low V requires a plain camisole underneath, and Calmer is so soft that I wanted to be able to wear it right next to my skin. I considered a higher V but it struck me as a little boring - been there, done that! The back of the shirt will provide a strong visual impact and the front should be just as striking without taking over the spotlight.

After a few more sketches and swatches, I decided on a deep keyhole neckline with a frog closure at the top.

sketch for front of sunflower cami

I think that this will work really well with the back - it's clean but it's interesting. (And sexy!) I'm going to finish the neckline and armholes with applied i-cord, and I'll probably reinforce the sides of the keyhole somehow so the fabric doesn't stretch too much at the closure point. I am still up in the air about the bottom edge, so I borrowed Marnie's technique of starting with a provisional cast-on, as you can see here:

front of sunflower cami

I sort of want to put a leafy lace edging along the bottom to go with the flower but I'm worried it might be too busy. When I get to that point, I will probably swatch and see. Otherwise, I could finish the bottom with more applied i-cord or a little ribbing.

As for the back, I think I've finalized my sunflower design! Here is half of it (again with a provisional cast-on):

half-sunflower swatch

It's a circle inside, a hexagon outside, and the proportions resemble a sunflower. Perfect!

Jun 1, 2007

Indigo Flowers II

Cross-posted from my blog.


It's the weather. High temperature and high humidity had successfully prevented me from knitting anything for the past ten days. Instead, I spent my leisure time drawing, sewing, and reading art history books. When I finally picked up the smooth bamboo needles (last night), it was refreshing. The result, my friends, was this piece of Indigo Flowers.


The schematic sketches had been done a while ago. Shown here is the sketch for the sample. There is a bit of waist shaping, and the V-neck starts 2" (5 cm) below the sleeve openings.

There are several things to say about the design. Firstly it is done on two straight needles. I prefer knitting in the round, but when I am not 100% sure about the results--in this case it's the look and shape of the large lace panels--I work on straight needles to save time. Secondly, I started with a front piece instead of the back piece, for I have to see how the lace works at the shoulder, then decide how wide the back lace panel should be. Finally, the back neck shaping is undecided at the moment (see the question mark?); again it is because we are dealing with lace here, we just have to wait and see.


This vest has been sized up to 45" chest circumference, as I consider it a flattering piece for most women. Now that I have a large enough piece, I can see that the lace panel actually provides a lot of ease, and follows the curves smoothly. It seems unnecessary to change the shaping for larger sizes--it suits me well, I'm lazy ;-).

So far it has been smooth and easy, and my projection of the knitting time is surprisingly short (20 hours). I guess it's because of the needle size (US7, 4.5 mm) used. The very simple, 6 X 6 lace pattern has helped too. Only after I bound off the stitches for sleeve opening did I start to spend time thinking about how to distribute the decreases. After some sketching, I decided to decrease over the Calmer part until there are 6 stitches left, then decrease over the garter stitch border of the lace panel. Finally the outer most lace repeat will lose a few stitches--we'll be at the shoulder by then.

All right, that's all for now. I'll keep you updated ;-).

Iris

P.S. One of my friends pointed out that something's wrong with the photos. I have uploaded them again. Sorry for that.

May 18, 2007

Indigo Flowers Lacy Vest

[Partially cross-posted from my blog]

Currently I am into the concept of Contrast. Simplicity versus Extravagance. Casual versus Formal. Night versus Day. And the seemingly opposite elements must be united in one wearable design.

My first inspiration came from the Hermès SS07 collection. Below are some pieces that I particularly liked.


[The photos do not belong to me, and here they are used only for commenting reasons. And why do they look soooo depressed in such beautiful dresses?]

The first two handkerchief dresses are reminiscent of their SS05 collection As the river flows, an out-worldly ethereal collection featuring porcelain white chiffon dresses with fine indigo print.

Porcelain white and indigo: that's the second inspiration.


Fine china, my true love. Such intricate and beautiful tonal effects are achieved with a single color on a plain background. Another example can be seen here; they are basically the same.

The original name for the white porcelain with indigo paintings is Indigo Flowers. By the way, for some unknown reason the formal translation is Blue and White Porcelain, or White and Blue Porcelain. What unimaginative names...

Anyway, that's how I decided to make a long flowy vest with a simple cut. [Look at the third shot from Hermès, I want my cut be as clean. And the length should be shorter than the one in the fourth shot...not too long.] The Indigo Flowers porcelain will be interpreted by using a dusty indigo colored DK yarn (Calmer, that is) as the bones, or the background of the vest, and a silver/pewter colored lace yarn (Zephyr, in this case) to fill in as the flowers. The reason why I did not pick true indigo/cobalt blue and pure white is that I want the vest to be casual yet ladylike.

The idea of combining yarns of different weight is doable if the two can be worked on a same needle size. And I guess you've already got the solution: work the light one in a lace pattern. In this case, this is a perfect solution, for lace is what I want: light and cool to wear, elegant, stretchy. And a good lace pattern can mimic the filigree flowers on a porcelain vase.

The fifth Hermès shot echoed this idea; wispy lace looks lovely (and well protected) with a solid colored vest.


[Click to see a larger picture. Hey that's not me, I do not look like her!]

You see, I love the color combination--one can still see the reference to porcelain, but it's quite subtle and misty now.

The back is not shown in the sketch above; I plan to use a large area of lace. The vest can then be worn with everything backless or strappy, thus making a day-to-night transition smooth and easy. I'll see if I can get that shawl effect.

That's all I have for now. I'll be more than happy to answer your questions.

May 15, 2007

Hello everyone!


I can't believe I've just found this CAL! Thank you Julia and Marnie ;-) for let me in. It will take a while for me to go through all your wonderful design projects here, and I'm sure that I can learn a lot.

I've been knitting for many years and seldom followed a pattern. This April I started my knitting blog and pattern writing. Like many of you, I consider designing a fun creative outlet, and I post my designing process all the time. For this CAL I plan to use Rowan Calmer first, for there are a few balls lying in my very small stash, and it's a great summer yarn!

Happy knitting and designing,

Iris

May 8, 2007

Tank Modeled


Here is the unfinished tank I 'designed' for the CAL. I am finding the tininess of the boys the greatest excuse for unfinished objects. I intended to finish with buttons and loops on the shoulders but that went by the wayside towards the end of my term...just could not work up the energy. I have some great buttons that are so inappropriate but adorable, they are pin up girls under clear plastic...initially bought for a friend, but I find the cheekiness of them something. We will see. And it is not like they will know, they cannot see their shoulders yet or admire themselves in the mirror. I have that type of sense of humor, slightly subversive and occasionally seeking the shock value. I will post the buttons if I use
them. For now, we can just take in Owen in his 'dress'. What a cutie. And he is the 'big' one. We will see about tank 2. I have no idea what I cast on, etc. as my notebook is somewhere in our room and our room looks like a tornado hit, what with baby paraphernalia strewn about: burpies, bottles, breast pump, dipes, clothes (that do not fit). Good lord, who knew such little things came with so much stuff. Gotta' love it, really, you end up loving it.

May 2, 2007

S-s-something from the comments*


So, longer ago than I'd like to admit, Kristi asked me:
So of course I'm curious why you didn't leave the underarm space -- because it messed with the lace?

I think the space is less imperative on smaller sizes -- if you were doing a conventional shaped sleeve, your initial bind off would be about (chest - crossback)/2 on each side (this is assuming you're in the round) Or even less.

Plus, the lace is going to be more flexible/less bulky than stockinette and stretch or constrict as needed.

If you're thinking of sizing up the pattern though, I think the underarm shaping will begin to make a big difference.


Instead of writing her back (eek, sorry) I thought I'd post my response up here where y'all can see my reply because, man, she is just full of damn fine information.

The original concept of the piece was to work a lace, that had vertical symmetry, up the side of the piece, then split it off for the armsceye. The sleeve would be constructed the same way giving an uninterrupted path for the lace. The idea was that the lace would never appear to break even though it obviously had to split for the sleeves.

If I wanted to do a bind off at the underarms, I would have to gradually migrate the lace inward to be just inside the bind off point. This is possible but I really wanted to avoid disrupting the pattern.

With Kristi's great insight, I see that the combination of the stretchy Calmer and the small size make this possible. It does seem to work great for me so far. I have to seriously think how I'll approach the larger sizes (yes, I'm getting persuaded to actually write the pattern.) though.

If I do decide to write the pattern, I'll probably knit a partial second piece and do a gusset on one side and migration of the lace for a bind off, on the other to see which produces a nicer effect. I won't have to work a full chest circumference, just enough to be able to visualize the end result. Again, as Kristi pointed out, the lace will give some flexibility and the yarn is stretchy so I think I would have to do a relatively small amount of binding off even for a much larger size.

Talking to my dear friend, Julia, yesterday, I feel ready to tackle the neckline, which I've put on hold for a couple days while I contemplate. She suggested just a folded hem and I like that idea very much. I'm also considering something with eyelets that can be cinched in a little, to accommodate various undergarments. Either way, I want it to be relatively unobtrusive since there's already a lot going on with the lace. In the end, I think her hem idea is going to win out.

*Nod to Ze. I miss his show, The Show.

Apr 30, 2007

One knit, Purl too

Knitting has nearly slowed to a screeching halt now that there's a new pup in the house, but what knitting there has been has been good.

I've worked up to where I'm starting some neckline shaping on Lily


The fit seems fine, though it's always hard to tell before the neckline is done.


I will probably work a simple 2 or 3 stitch i-cord edging for the hem and sleeves. I think that will be the least disruptive treatment and will be OK both on the busy sleeve and the simpler hem.


As for the new member of the family, I think we finally have a name that everyone can agree on. The name is now, Theano Purl, Thea for short.
Theano was believed to be the wife of Pythagoras, (he who brought us the calculation for determining the hypotenuse of a right triangle,) and likely continued his work and ran his school after his death. We wanted a name that gave a nod to the sciences but which was also a cute doggy name. We considered "Evo" short for "Evolution" and "Jane" for the one and only Ms. Goodall. Neither name really stood out as exceptional names for a dog. Theano, though, very cute. I got to keep Purl as her middle name too so she can be little Thea-Purl, if the mood strikes.


See a bunch of pictures of the two girls by clicking the photo above, or clicking here.

Apr 23, 2007

It's not rocket surgery

Hey, it's a Lily update.

The second sleeve knit up in a jiffy, even with my lack of free time, and then it came time to join all the pieces into a single unit. While the sleeves were knit flat (more a product of my lack of US #7 DPNs than anything,) everything else is knit in the round. The process is largely like that of the relatively ubiquitous top down raglans (Good ol' Barbara Walker!) only this one is bottom up.


The pieces and I had a bit of a kerfuffle at the time of joining. The body was knit to a slightly different point in the lace repeat than the sleeves and I did not realize this until the second round of attachment. I had to decide whether to rip out the extra rows in the sleeve or attach another ball and knit up the body further. There may have been some language unbecoming a lady. Panda offered to jump on my lap and help, but we both ended up showing much restraint.

I decided on the former option, ripping down, as I can use the tails to seam the sleeves, later.

I don't feel like the rest of the piece should pose any real problems, it's not brain science, after all. I'm keeping the formula fairly simple; decreasing every other round, yet, I have this foreboding feeling that when its all done, I'm going to need to rip back. I'm not sure why. I think some of it stems from the fact that I'm not doing any sort of bind off under the arms. Will it be all bunchy and uncomfortable? I am waiting to try the piece on until I've worked a few more rounds and if I do have to work back, I have a few ideas for remedies, but I'm really hoping I don't need to go that route. Because the body is knit in the round, even a gusset would pose a lot of work. Don't you even think about using the "s" word with me. Some of us learn from our friend's blog posts.


I think I always have this sort of anxiety when I'm knitting my own designs. No matter how much I do this, there's always some portion of the process that seems more dictated by the little knitting fairies and gremlins than by math. Hopefully when I'm all done, I'll love it and wear it with pride, but for now, it's too soon to tell.

Mar 29, 2007

Change of plans?

So I got my yarn today. At least the premiere I ordered. I have 10 balls of Calmer (40 bucks for all ten on ebay!) on it's way in a tangerine color. Really pretty. So I know this isn't white, but she didn't have the 6 she said she did so I got this instead. 8 skeins. After touching this yarn I think I want to do cables with it. Something about this yarn says texture. So I'm working on another design. I am going to save the other two designs for the Calmer when it gets here, and work a new one in this yarn. The picture is close to true color, it's a bit more grey than it looks there though. My flash makes everything brighter.
I also made buttons, because I saw premiere didn't have one. I can make some for the other yarns as well if anyone wants one. I just don't have those yarns to use for the background. Or someone can send me a pic of the yarn and I can do that. Anyway, I just wanted something to put on my blog and show some love. One moving and one not.


Mar 28, 2007

CALMER

This is for another project, but I thought I would ask---DOES ANYONE HAVE 4 BALLS OF CALMER #460 DRIFT--because if you do I would love to buy it--I just thought if anyone had it and wanted to get rid of it this was a good idea, instead of going to a yarn shop...does that make sense to anyone but me? We could exchange as well I have several colors of Manos Wool, Crystal Palace Merino Frappe or Trendsetter Zucca. THANKS-Edna

Mar 13, 2007

Revenge of the sleeve.

While I have done a fair bit of design, there are still aspects of the processes that I can only perfect through trial and error. All the excel sheets and schematics in the world cannot reproduce the look and feel of knit fabric adhering to all the laws of physics. Julia has a really nice post in which she discusses the process of designing without knitting the piece herself. In her case, her sample knitter helped ease that processes by providing continual feedback, as she was a fine designer in her own right. However, I think this is a valuable lesson to take away. While I consider Julia to be a hugely skilled and technically adept designer, who has years of experience knitting and designing knitwear, even she cannot completely predict the way the finish piece will need to be constructed in order to execute her vision.

As a side note, this is one of the beauties of the web and why I absolutely love being a part of this CAL. I cannot imagine how critical I might be of my own work, if I didn't have the blogs of other designers to show me that all of us face the same challenges and missteps.

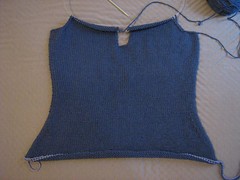
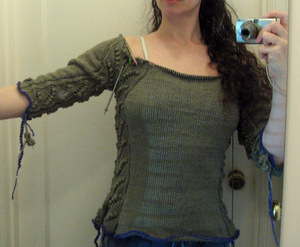
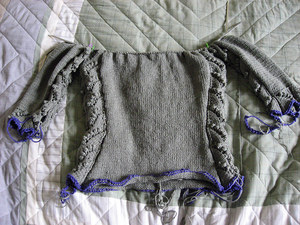
Back to the topic at hand, Lily has gone surprisingly easily throughout the body portion of the piece. While I debated on length, a bit, and I may still close the side vents up a little bit, the bulk of the design process went pretty smoothly, once I had my original vision.

From here, I knew I wanted to knit the sleeves up to, but not including, the sleeve cap, so that I could join all the pieces and work them together, to avoid any possible offset of the motifs.

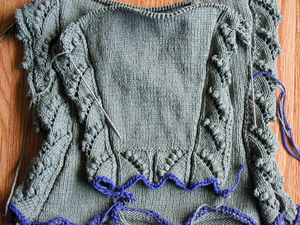
There were no problems with the body, the sleeve, however, has dogged me. This humble elbow length sleeve is the product of, not one, not two, but 4 trips to the frog pond.

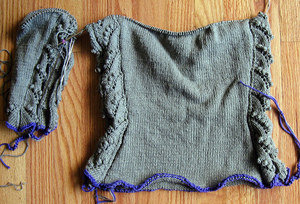
It's a testament to the quality of Calmer that I see absolutely no change in the yarn, despite all that ripping and re-knitting.

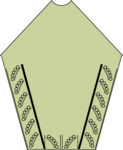
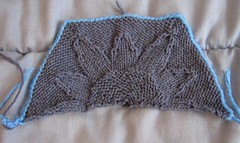
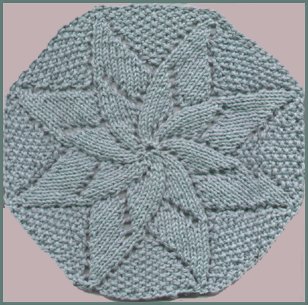
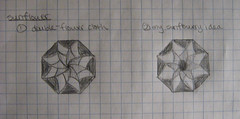
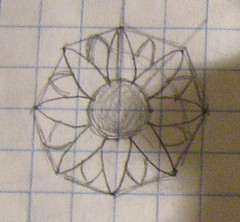
My first thought was that I'd migrate the motifs from the front of the sleeve, around to the back seam in preparation to run the motifs up the sleeve cap. I felt that just running the motif up the seam would look peculiar and unbalanced. Something really needed to pickup the theme, on the outside of the sleeve.

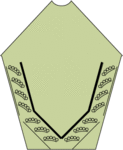
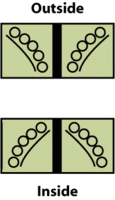
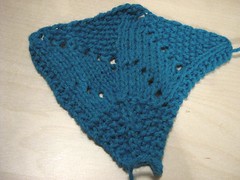
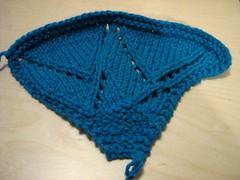
If you are astute, you've already caught my big mistake here, however, I knit about a quarter of the sleeve and realized I just had too much ease worked in and ripped the sleeve to start again. It was only when version two had hit about the halfway point, that I realized my fatal flaw. If the motifs were correct at the outside of the sleeve,they would be flipped at the back seam as shown in the illustration below.

As the great philosopher, Homer, said, "DOH!" That was a real head slapper moment.

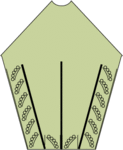
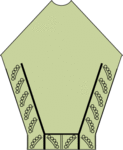
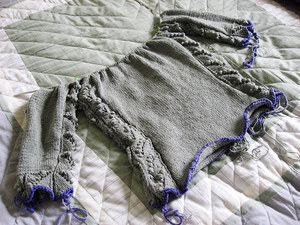
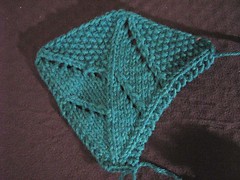
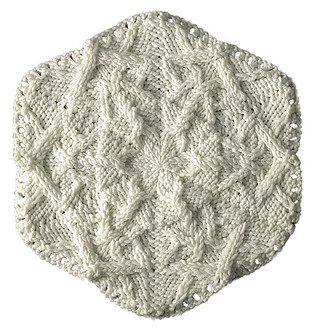
I realized that my new calculations worked out perfectly to fit 2 full motifs across the entire hem of the sleeve (a centered full motif on the outside of the sleeve, with two half motifs inside by the seam). I knew I didn't want to carry the outside motif up the entire length of the sleeve, firstly, because it would be too busy and secondly, because when it came time to decrease for the sleeve cap, I'd be left with a lot of lace to wrangle into submission. I decided to just work the outside motif once. I tried maintaining the purl ribs up the length of the sleeve but found it added a sort of sporty feel that was inconsistent with the vast stockinette of the body.

So I took out the purl ribs, after the first repeat.

I was getting much closer but there were two things that bothered me. First, the outside repeats just seemed to look uncontained. There were still strong lines delineating the edges of the motifs on all sides except the top. Something just seemed off. I also didn't care for the fact that I had begun the sleeve shaping, while working the first repeat. It meant I had to increase in the purl ribs between motifs. Since I was eliminating the extra purl ribs and motif, it just didn't look cohesive.

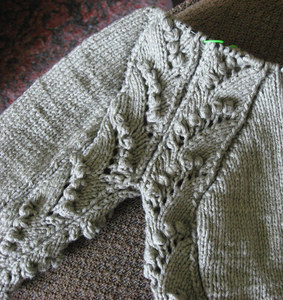
After all that, 5 times was the charm.

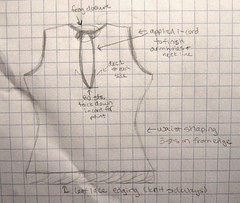
I added a purl ridge to the top of the outside motif, which added the visual container I felt the motifs needed. Additionally, I held off on any sleeve shaping until I had completed the border of repeats, allowing me to increase in the stockinette area, as I had on the body.

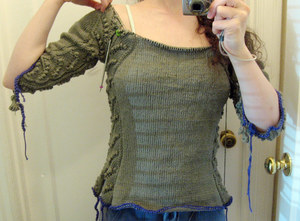
I think the final product is consistent with the style of the body and deals with the design concerns I had, in a logical way.

For now, Lily needs to go on temporary hold while I complete a project for a friend. Lucky for me, it's in Calmer too!

I hope to complete that in the next week or two, while I'm traveling and then I'll get back to Lily and all that she entails. I'll try to get a couple tutorials up in the interim, if time permits.

Mar 9, 2007

The Sophie Skirt


Well, here is my skirt thus far. I decided to name it Sophie, after my four year old daughter. She is such a sweet, feminine and sensitive little girl and this skirt is very feminine to me. When I was knitting this skirt I started thinking that she would love one too. So eventually I will knit her one and the perfect name is "Sophie".

After swatching I decided to go up a needle size for the lace portion of the skirt. I figure it would create more of the flair I was looking for and it also opened up the lace much more and I like that look better for this skirt. I did not know how many lace repeats I would do until I started knitting. I ended up knitting 1 1/2 repeats. The repeats ended with little "peaks". To pull the skirt in even more to create that "flair" I did a k3tog and then a k2tog on the next two right side rows. This created just the affect I was looking for and I was so pleased with the turnout.

I did the fun math to figure out the decreases and how to space them out. Because this will grow about two inches, I factored that into the pattern also. The skirt is looking a bit small and that is kind of freaking me out but if definitely grows two inches, I should fit fine.

I still have not fully decided what to do for the waist band. I need to play around with my swatch a bit. I want to do some sort of an eyelet waist band but I would also like it to somehow match the lace portion a bit. I am not quite sure how to accomplish that yet. If any of you have an ideas, please let me know!

Mar 7, 2007

Semi-Complete


I have come along on the tiny tank, it is almost complete, lacking only buttons and button loops. I did experiment a bit with finishing. My initial thought was to try an applied I-cord edging to neck and armholes. First attempt is not pictured, I ripped it finding it too heavy and my tension was uneven, leaving a sloppy impression. The I-cord is a nice look, but not at the armhole area. Next attempt was a crochet edge, half double, I think. It is not pictured, but I was dissatisfied with the appearance of the crochet, too elongated for the edge, detracting from the overall simplicity. I went back to the I-cord neckline with a simple slip stitch to clean up the armholes and feel relatively pleased with the end result. Finishing is an interesting challenge, requiring some patience and experimentation. I did not want to overwhelm the piece, but did not like the uneven edge created by the basket weave stitch pattern. This seems to be a nice compromise.


Overall, I am glad the first piece I designed is so tiny, it came along quickly and. remained manageable. It may be too tiny, but I have very little comprehension of what size the beans will actually be, so I’ll try to get them in the tank(s) ASAP when the time comes. I think initially babies are smaller than anyone realizes, so I will try for a photo or two…I do plan on making another, just to keep things even.

I really have taken to Calmer, I find the feel and resulting fabric lovely. It knits up evenly, shows a nice definition of stitch, seems to have a good bit of play from the synthetic component and is light enough to be worn in my climate. I have to learn to choose yarn for its wearability vs. its luxurity (not a word, I know). Calmer is not a cheap yarn, so I would like any recommendations for substitution. There are so many yarns out there, I usually try new yarn by seeing a project on another blog and using their suggested yarn. I am not the most adventurous when it comes to trying out a yarn, very project driven, am I.

I’ll come back once I finish button work. I plan on using this technique for button loops. I used it once on the Union Square Market Pullover (which resides with my sister in Northern California where she can actually use it. 100% baby alpaca in fingering weight on 3s makes for a really warm sweater. Learned that lesson.) adieu until then, I love reading all the various posts. Really good idea, Julia and Marnie!

Mar 5, 2007

On sunflowers, swatching, and sanity (or the loss thereof)

While I wait for my Calmer to arrive (I went with Slosh, a dark slatey blue - at least according to my monitor), I've started to plot out my idea. My inspiration comes from a washcloth that I knit a while back:

Yvonne's Double Flower Washcloth

That's the pattern picture, not my own version, but mine looked very similar. As I worked on it, I thought, "wouldn't this look great plastered onto the back of a cami?"

And so an idea was born. The washcloth is knit from the inside-out, and I've seen some sweater patterns that start as circles and grow out from there, but most of them are shrugs or cardigans, meant to be loose-fitting. What I want is a close-fitting top, where all the shaping is carefully planned and defined, and I don't think this would be possible if I knit the whole thing starting from a point and working outwards.

My next thought was that I could knit the cami in a standard, bottom-to-top manner, and leave an octagonal hole. Then I could knit the washcloth separately and seam it in. This would probably work, but the seaming could be tricky. I don't like tricky seams. Instead, I thought, I could leave the same octagonal hole, then pick up stitches all around the perimeter, and work the washcloth pattern from the outside-in.

sketch of back of cami for CAL project

This would require me to invert the pattern. I'm not sure why I thought it would be a piece of cake, but... really, not so much. I started by charting it as written. Then, as a first attempt, I rotated it 180 degrees, replaced all the decreases with yarnovers, and replaced the yarnovers with decreases, using left-slanting or right-slanting ones according to what looked correct on the chart. I resolved a minor issue of having to add additional "no stitch" boxes, and then I knit 2 wedges using some cheap acrylic. (I like to do technique swatches in scrap yarn, and save my good yarn for swatches relating to gauge, stitch definition, drape, etc.)

first swatch

It's not bad, but there are quite a few things I'm not happy about here. (I added notes through Flickr, so if you click on the swatch picture, it will take you to the Flickr page and you can see my comments in more detail.) That's when the danger started. The more I looked at the original washcloth pattern, the more I realized that I wouldn't be happy merely with working it backwards. I imagined that the double flower resembled a sunflower, and wondered how I could make it more sunflower-esque. The simplest modification was to work the center circle in seed stitch to represent the seeds of the flower. (Seeds in seed stitch! Awesome!) The other modification I wanted to make was to separate the inner flower from the outer flower a little bit more; in the original, the inner flower is exactly the same shape as the outer one, only smaller. I wanted to reverse the swirly curve of the inner flower. Here's a bad sketch:

sketch: idea for flower modifications

So I made swatch #2. Looking at it now, I guess I hadn't tried to flip the inner flower around yet. That came later.

second swatch

At this point, I started to get incredibly frustrated. All my good ideas seemed doomed to failure. Nothing wanted to line up the way I planned. I made one more attempt; I changed the outer triangles from seed stitch to stockinette, and I changed the seeds to reverse stockinette. (It made me very sad to not use seed stitch for the seeds, but it's nearly impossible to hide all those decreases in seed stitch.)

third swatch

Getting better... but still not great. I didn't like the line running along the left of the outer petal that continued down to the flower's center. Also, I noticed that through all my modifications, I had lost the swirly nature of the original washcloth; all my lines seemed to have straightened out, and it looked more like a bunch of triangles than a flower. I went from frustrated to downright angry. I came close to tearing up my notes, cutting my swatches into shreds (remember, cheap acrylic), and abandoning the idea entirely. In a last-ditch effort, I turned to Google, to see if something similar had been done before. I couldn't find a single flower knit from the outside-in - perhaps that should have been a sign - but I did come across this:

snowflake from Berroco

It's a snowflake that's knit from the outside-in, and it uses cables for texture. Cables! Brilliant!

I realized that I had become much more attached to the sunflower concept than I was to the swirly lace washcloth, so I studied some pictures of the flowers, tried to shove the washcloth pattern completely out of my mind, and made this sketch:

sketch of sunflower

Using a combination of cables and decreases for shaping, I made a scaled-down swatch. I was downright sick of swatching (and if I never see turquoise acrylic again, it will be too soon) so not only is this not a full circle, but it also is much shorter than the actual flower on the cami would be.

fourth (and final for now!) swatch

Ladies and gentlemen... or only ladies, as the case may be... we have a winner!!

I'm not quite done with it yet; given the angular spread of this swatch, I think I might have to turn my octagon into a hexagon and switch from eight large petals to six. Also, each petal here produces its own point, so with 6 of them, I'd have 12 points total, and I don't relish the idea of planning a 12-sided hole. I might be able to block it to a 6-sided shape, or maybe I can slip the small-petal stitches on the first round? I haven't figured that out definitively yet, but I'll keep working on it while I wait for my Calmer.

I'm calling this my Sunflower Cami, for obvious reasons. And please, please, don't ask me what the front is going to look like yet. I will probably break down in tears and throw something at you.

(Kidding! Mostly.)