A little more Lily and some wonky nupps
Because I don't have a definite plan mapped out for Lily, the time I've spent knitting the body, so far, has been a nice time to contemplate how I'll handle the arms and upper body of the piece.
Progress has been largely smooth, though I've had to tink and rip out some mistakes in the lace a few times. It's not a hard lace pattern but I've found I've repeated the same mistake with the nupps a few times.
I took a class on Estonian Lace, with Nancy Bush, about a year ago. In it, she demoed nupps as a detail worked over 2 rows. On row one, at the point that the nupp is to be performed, one works a series of alternating knits and YOs into the same stitch, always starting and ending with a knit. On the following row, all the nupp stitches are purled together. Shown by an expert, they seem deceptively easy. In the hands of a novice, they can be the instrument of torture. An even and exceedingly loose tension is required.
Barbara Walker prescribes a slightly different method. At the point of the nupp, 5 stitches are worked into one by alternating knit and purl stitches into a single stitch. The stitch count is reduced back to the original number, immediately, by passing the 4th, 3rd, 2nd then 1st stitch over the 5th one worked. I speed this up, ever so slightly, by grabbing all 4 stitches at once and passing them over the 5th stitch, in one step. However, I've been known to grab one too many or too few stitches, in the process, and throwing my stitch count off, unbeknownst until two rows later. The only fix is to rip back, though I usually do so over only the 11 stitches of that half of the stitch repeat.
Regardless, progress continues, as you can well see.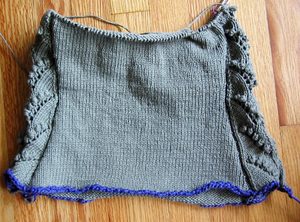
This shows the start of the 6th repeat of the 7.5 that I'll need before the armsceye begins.
You may be able to tell that there is a fairly long vent up each side of the piece.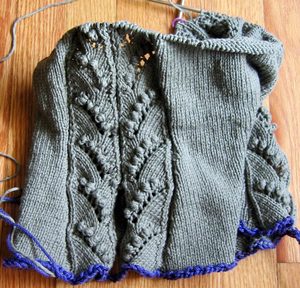
I may seam up a little of it if I decide to put an additional hem on the piece. However, if I end up working just a crochet edge, the vent will stay, as is.
I've added the vents to improve the drape of the piece. I have a 10" difference between my waist and hips and when I shape at the side seams only, it tends to cause the fabric to buckle in odd ways, even when the measurements are perfect for my size. The fit is far better when I use waist darts, but they would have distracted from the lines of the piece, so the vents seemed the best alternative.
![[calpremiere.jpg]](https://blogger.googleusercontent.com/img/b/R29vZ2xl/AVvXsEiy0wh_95AcwniXEoBtZoHC2yUGJ2XuU8O_-D10FxvaeOSiaAAZM1J1JUHI-8zfGrMG6XFuO6WtsDA4bnq_jySFC87TnR_W_sP1M8F3Qm7KH-Rd4DMFp-C4FxTnvsq5uT1cptxd-XgQHng/s1600/calpremiere.jpg)
![[calpremieremove.gif]](https://blogger.googleusercontent.com/img/b/R29vZ2xl/AVvXsEjp5NGvZgOE3ghqG0Ksh0c6lFPEO_0hIHk4O2P5pWZ0wWdFS4L7lVQCH-6GkDPyynDaflFO1bc7V2YGCat9AKdSoPMgef2GrBPfe_b6l-llR-Ls7M-2KzYlwBBU_ehpWtIBFM6cdbKlA84/s1600/calpremieremove.gif)
2 comments:
I love the venting idea that you're using on this piece. Side-shaping never works exactly as it should for me, either. I will probably either employ darts in my piece, but for the right project this is a cool option.
Hmm, I'm starting to wonder, does side shaping really work for anyone? (Or I guess I should say, is it the best solution for anyone?) I think we all use it because it's simple, but I too have found that when I want the perfect fit, I have to move the decreases closer to the center. The vents are a great idea!
Post a Comment