Swatching and sketching Lily
I love Calmer to pieces. It is the same yarn I used for my Deciduous pattern, so swatching would not be so much about determining gauge and best needle choice (though it never hurts to double check.) Instead, this would be a matter of deciding how different stitches would look in the yarn.
Like Julia, the process of coming to a design is fluid for me. I may start with a stitch I like, or a yarn, or even a color. The process of starting is usually a mix of sketching, looking through "inspiration" images I have around, and swatching. In this case, I decided I wanted to do something with a stitch pattern that could easily be split in two, to diverge around the armsceye. The pattern would run up the sides of the garment and would pick up again along with the sleeve cap, so that it would look, basically, continuous.
I finally decided that the Lily of the Valley stitch pattern, in one of my Barbara Walker books would work just fine.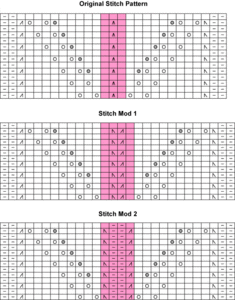
I charted three different versions of the lace. It's a simple enough pattern that, at this stage, a chart is sufficient to see how the lace will be effected by the changes. I've highlighted the stitches that changed from iteration to iteration. I first split the double decrease into paired decreases, but I didn't want to have to seam the sleeve into the armsceye, through the double decrease. Since there is already a column of purl stitches on the outside, I thought that maybe two purls in the center would look nice. Finally, I removed the extra knit stitches on either side of the center decreases, because I didn't want the motif to get too wide.
The results is that up the sides of the garment, where the motif is intact, the purl stitches would close up, leaving what looked like a seam, along the armsceye, it would leave me a place to seam.
On to the swatching.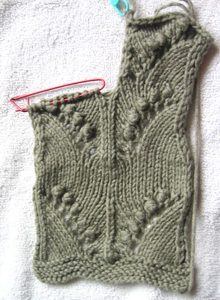
First I decided to knit the newly charted lace. Then I split the lace, knit that for a couple repeats and played around with the swatch to see how the lace would look as it curved around an edge. I was happy with the results, bound them off, but did not cut the yarn.
I cast on a new swatch, keeping the original swatch attached, with a locking stitch marker in the last stitch, to keep the piece from unraveling.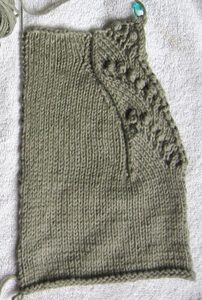
This second swatch was specifically to determine gauge and to play around with the decreases. I had to decide if my full fashioned decreases would happen by working the outermost purl stitch with one adjacent knit stitch or whether I'd work the decreases right after the purl columns, utilizing two knit stitches. I decided that I didn't want any glaring indicating that I had worked a decrease so I chose the former option. When stretched out, the knit decreases looked better, but I wanted this piece to have a slim fit but not so tight that the purl stitches would actually show, so the stealth decrease won out.
After knitting everything, I washed and blocked my swatches, still keeping them attached to the ball and to each other.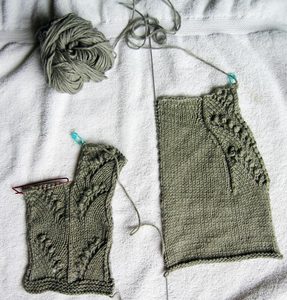
I have more than enough yarn to complete the project, but I still never like to cut yarn just for a swatch. Sometimes, you just have to cut. For instance, if you are going to work in Rowan Denim, you will really need to send your yarn through the wash to check the gauge and you can't do that if it's attached to 30 grams of unknit yarn. However, if you are just going to hand wash your piece and you don't expect the yarn to change drastically in the process, leaving it attached should not be a problem, and if you find yourself a little short for yarn near the end of the project, you can cannibalized your swatch for the extra needed yardage.
All while I'm swatching, I'm thinking about how I want to knit the piece. In fact, there's really no point during the designing and knitting of a piece that I won't diverge down another path if the mood suits me. However, in the interest of trying to document the whole process, this is the current state of my grand scheme.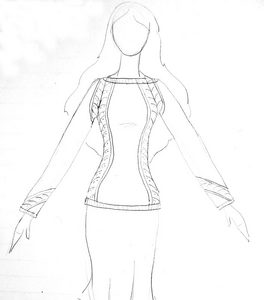
This is how I envision the final piece. It'll be a pull over with a boat neck and shaping at the waist. The sleeves will be raglan style to allow the lace to angle gently. I figured a set in sleeve would require the lace to diverge too severely and wouldn't look good. And of course, the piece will be named, "Lily."
Now that I have my gauge and my vision, I can begin to plot out the actual pattern.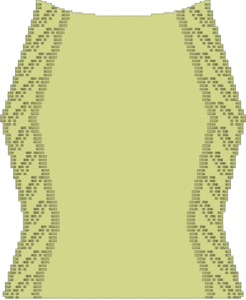
I like to set up a grid to the same scale as my gauge in Adobe Illustrator, and graph out every stitch. This, obviously, is the body. The piece will be identical in back and in front. I'll start plotting the sleeves later, but for now, this gives me enough info to start knitting.
![[calpremiere.jpg]](https://blogger.googleusercontent.com/img/b/R29vZ2xl/AVvXsEiy0wh_95AcwniXEoBtZoHC2yUGJ2XuU8O_-D10FxvaeOSiaAAZM1J1JUHI-8zfGrMG6XFuO6WtsDA4bnq_jySFC87TnR_W_sP1M8F3Qm7KH-Rd4DMFp-C4FxTnvsq5uT1cptxd-XgQHng/s1600/calpremiere.jpg)
![[calpremieremove.gif]](https://blogger.googleusercontent.com/img/b/R29vZ2xl/AVvXsEjp5NGvZgOE3ghqG0Ksh0c6lFPEO_0hIHk4O2P5pWZ0wWdFS4L7lVQCH-6GkDPyynDaflFO1bc7V2YGCat9AKdSoPMgef2GrBPfe_b6l-llR-Ls7M-2KzYlwBBU_ehpWtIBFM6cdbKlA84/s1600/calpremieremove.gif)
5 comments:
I'm already in love with this. It may turn out to be one of my favorite of your designs yet!
But I'm going to nudge you a little on the process, because I want this to be more transparent to people who are just starting out. Can you do some posts for us on considerations to take into account when planning the splits at the armscye (with close-ups!), and can you do a few techie illustrator posts? (like how do you make those symbols?!) The create-along wants to know!
I also want to point out to everyone that they don't have to use a stitch marker to keep the swatch from unraveling. You can alternately just make the final cast-off loop large enough to pull the whole skein through. I do the same thing, and I generally cannabalize all my swatches at the end because I have that illness that drives me to use every inch of yarn in a project. God help me.
By the way - you rock - this was a really great post.
Miss you!
Your swatches and design ideas look gorgeous so far! I also would love to hear more about the technical aspects of your design process - I use computers a lot, but for whatever reason, when I'm working on a pattern (either making my own or modifying someone else's) I usually sit down with a pencil and a pile of graph paper. I do everything by hand and it works pretty well, but I wonder how much quicker and easier it would be using graphics software.
I will definitely post more about the technical stuff I do. I will tell you, though, it's probably slower to use a computer for a lot of the stuff I do, especially if I'm not going to be resizing the piece or playing around with the look and feel too much. In general, I can spend hours doing what would take me a fraction of the time on paper. I like it, though because when it's on the computer, it's much easier to manipulate and rework. That's where the time savings comes in.
Wow. I thought paper would be more time consuming. I love seeing the process you went through. It helps me understand more what I should be doing with my ideas in terms of designing. All the ideas in my head can certainly be made more clear by the process you are showing us. It is a great help for someone like me who is just starting out.
I think one of the things that appeals to me most about this blog is finding out all the ways there are to go about the process. There's definitely no "right" way, there are probably some ways that aren't as wise as others, but for the most part, there are as many ways to go about the process as there are designers so don't feel like you have to do it my way or julia's way just because we've been designing for a while.
Post a Comment