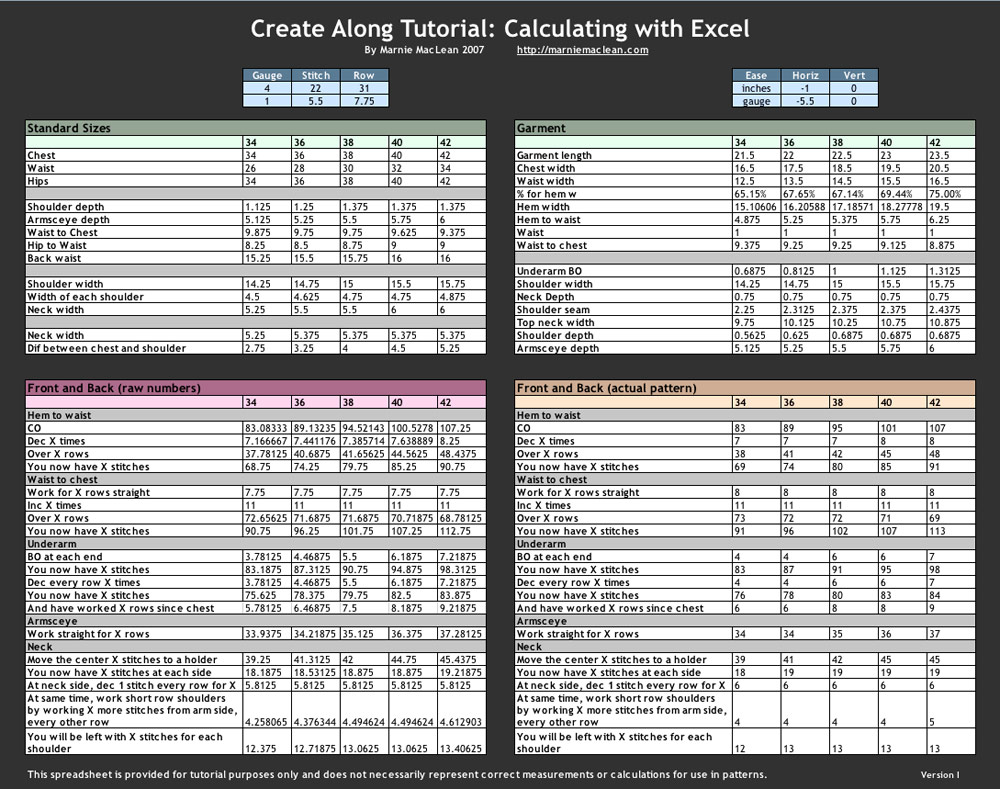
Download the spreadsheet and play along at home.
It's been a while since I've done a tutorial and seeing as I use this technique
all the time, it's about time I shared it with all of you. This also makes
me feel better about the fact that I do not have any updates on my CAL project
to post, as my deadline pieces are all keeping me
busy.
NOTE: The attached
spreadsheet is just a sample and contains measurements
that may be useful but which may not meet the standards for some publications.
You are welcome to use what I have for your own design purposes but it'll
be you who has to ultimately support any patterns written from it, so do
your research first.
The goal
Excel can be used to help you organize and plot your final pattern. Unfortunately, it can't do all the dirty work, but you can find yourself being a bit more consistent, if you let the program do your calculating. If you plan to submit your patterns for publication, providing a spreadsheet with all your work can be of great help to the tech editor. Doing so, may make logic errors more obvious and allow for faster editing.

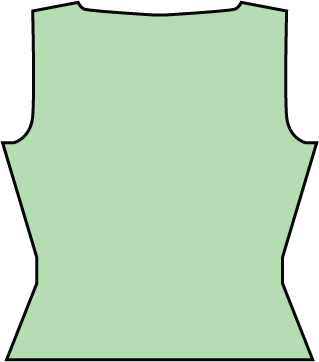
A rough schematic of what we are shooting for
For simplicity's sake, we're going to make a simple boat neck top that is
identical front and back, has waist shaping, set in style armsceyes and just
a little shaping at the neck. Obviously, the more parts you have and the more
they vary, the more calculations and measurements you need. Frankly, since
I am not in the apparel business and most available resources only offer a
limited number of standard measurements, there is a point, for me, when I must
make a leap of faith with some measurements. Luckily, knits offer a certain
degree of give and take and being off a stitch or two will not generally ruin
a piece. For a fairly comprehensive list of measurements and wonderful design
instruction, I highly recommend this
book.
At this point, don't worry about whether you'll knit in the round or not.
It's not even hugely important if you'll work bottom up or top down, though
it is usually most intuitive to organize it to flow in the same order that you will knit the piece. For this tutorial, we'll be working bottom up, so all measurements will start at the hip.
Getting started
The first thing to do is create an area to set your gauge and ease. I like
to set up the gauge box to auto calculate the stitches per inch (or per centimeter,
if you prefer) out of some larger area. Generally, I do 4 inches. Tthe way
that I have it set up, I can change that if necessary.
Make a box for gauge with 3 rows and 3 columns (see below)

Create boxes for your gauge and ease as shown above
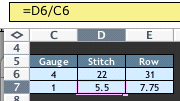
Set the number of inches measured and then a single inch below it. I have
"4" here but you could measure 6 inches or 3 inches or any other number you
like. On the row below, set the calculation to divide the previous row's stitch
column by the number of inches. It should look something like this.

Dividing 22 stitches by 4 inches gives us 5.5 stitches per inch
I prefer to do this instead of hard coding the division by 4, because there
are times I need to change gauge after I've made the spreadsheet. This makes
it far more flexible. I can change how many inches I measured and how many stitches
I get and the stitches per inch always properly calculates.
Go ahead and set up your Ease as well. I added a vertical ease option, but
I don't think this is terribly necessary. You'd want to use this if you tend
to work with a lot of negative ease, since doing so will eat up length. For
the horizontal ease, I've used a negative number just to show that it works
with both positive or negative numbers. You can adjust this at any time and
the calculations will update. For ease, I set the amount of ease in inches and then multiply it by the appropriate gauge. This can make it faster to make some calculations.
Expand on your formula
Excel is really great at quickly calculating adjoining cells based on the
source cell. It does this by maintaining a relationship between the different
variables.
You'll note in the spreadsheet, that
I set up each area so that the sizes stay in order, side by side.
If I want
to make the waist 8 inches smaller than the chest, for all
sizes, I can quickly and easily do this without having to type in a formula
for every cell.

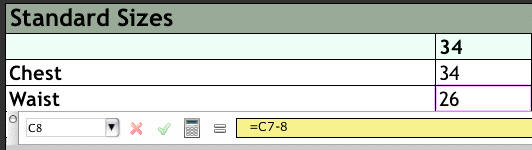
To calculate a waist that is 8 inches smaller than the chest, your calculation should look like this
To do this, just click the first Waist cell, go to the Formula Bar (you may
have to choose to make this toolbar visible) and click "=", click the chest
measurement cell (in my case, C7) then type "-8" and press return or tab. The
picture above shows the formula as it should be for the Waist for size 34.
The waist becomes 26" based on the formula entered.
Now to expand that to all the other sizes, select the Waist cell for size
34, move your cursor to the lower right corner of that cell until a black plus
sign appears. Click and drag across all the other sizes in that row.

When your cursor becomes a little plus sign, you know you are ready to expand the formula to adjoining cells
All the sizes will automatically update.
Name that cell (Hey, this ones an important one!)
The function I just showed you will be your best friend. Once you have your
basic measurement for each size, you'll only write your formulas once, and
then expand them to the other cells in the same row. However, there are times
when you do not have a different cell value for each size. For instance, you
only have one stitch gauge. If you multiply the waist width by the stitch gauge
and do the function above, to expand it to the other sizes, Excel will look
for the next cell to the right of the gauge, to determine the gauge for that size. Excel
doesn't understand that the gauge is a set value and must be applied to all the sizes.
You can solve this problem two ways. First, you could set up a gauge box for
each size so that when you expand the formula, there is always an accurate
value, but that's not ideal. Instead, you can name the cell associated with
stitch gauge. When you name it, you are telling excel that whenever you use
that cell, it's a fixed element. Don't go changing it when I expand a calculation
across the row.
Be careful, though, if you name a cell you don't mean to name, it can throw
off your calculations later.
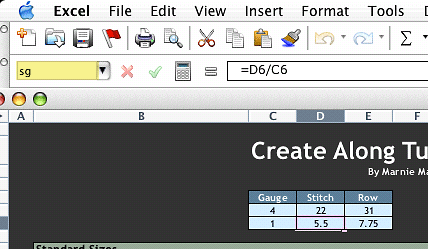
To name a cell, click it.
Go to your toolbars and make sure the Formula bar is visible. This is the
same one you used to to type in your calculations. To the far left of the Formula
toolbar is a box that tells you the cell's name. Normally it will be a letter
and a number, indicating the column and row location of that cell. Click your
cursor in that box and type in a name. Click enter. Your cell has been named.
I named the stitch gauge "SG" the row gauge "RG" and also named the horizontal
and vertical ease.

Now when you can type in "sg" into any formula and have it pull in this value.
While creating a formula, you can also click on the cell to have "sg" added
to the formula.
If you are trying to name a cell and it doesn't take, make sure you are pressing Return
after typing the name. Just clicking somewhere will not apply the change.
Let's start calculating
I generally organize my info in the following way, but you may find a better way that
suits you.
In the upper left, I place my slopper measurements. These are the actual body
measurement with no ease worked in. Decide how many sizes and what measurements
you need and start filling them in. It can be helpful to break up the measurements
into meaningful sections. I just used a gray bar to add a little space. You
might also want to color code length measurements and width measurements to
help you quickly find values when you are working up a formula.
To the right, I create an area to calculate the size of the garment. This
will include ease and will be used as the basis for the final pattern. Refer
to your schematic drawing and decide what measurements you need to produce
each step of the way. I find that I'm actually doing this part and the next
part, at the same time. As I'm working out the pattern, I realize I don't know
how to get my next value because I haven't provided myself the proper information.
At any time, you can add a new row, by Option (mac) or Alt (pc) clicking the
number below where you'd like to add a row.

Spiffing up your spreadsheet with color is optional, but I think it's a nice touch.
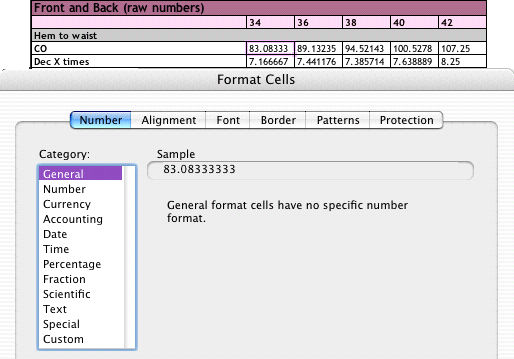
At the bottom, I have two areas for calculating. The left area is where the raw calculations occur. I am multiplying the stitch or row gauge times various measurements to get the number of stitches or rows I need to work. The raw calculation might tell me I need to cast on 65.2394 stitches. Show me how to do that and I'll buy you a cookie.
To the right, I have the rounded version of the numbers. All I do is indicate that the exact same number should appear there. How do I do that? It's easy. The formula is just an equal sign and then click on the corresponding cell in the Raw Calculations area. Then, we go back to our expanding trick and apply it all the way across the row. Once the row is filled, we can select it and drag down to rows below.
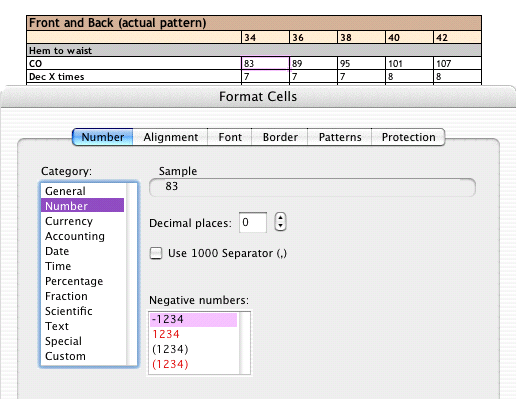
Then, I set the cell so that it shows the number with no decimal points. To do that, I type COMMAND (mac) or CONTROL (pc) + 1. This opens the Format Cell window.

I'm telling Excel to change the formatting on a single cell, but you would select all the cells in this area and make this change.
From the NUMBER tab, choose Number and set the decimal places to zero. This will round all the numbers to the closest integer.
You raw numbers are going to default to the "GENERAL" setting which is fine. That setting will just display the numbers for as long as the decimal cares to go or can fit in the spot. You might opt to change this for your own preference.

WARNING:
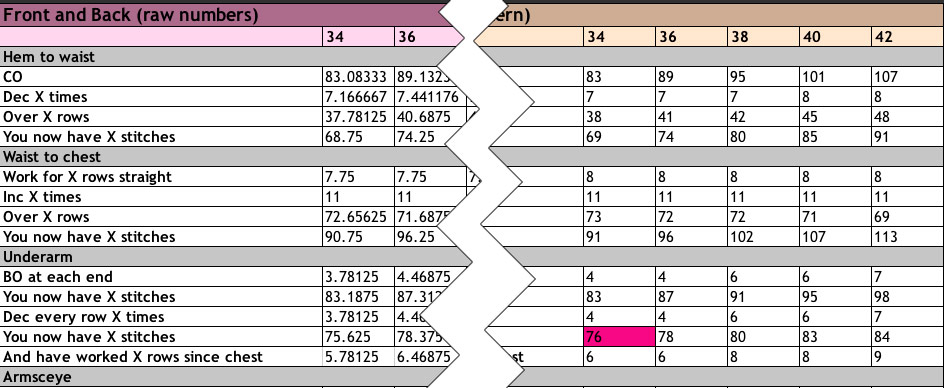
Just because something is set to round, doesn't mean the numbers will be right. Take a look at the "Actual Pattern" calculations for the size 34. If you pull a calculator out, you'll see the number I have highlighted is actually wrong. The number would rightfully be the
Stitches after the underarm BO |
83 |
Minus double the decreases |
8 |
Total |
75 |
Yet we get
76 in the spreadsheet . How come?

The answer is rounding errors. All those decimal places gained us a stitch somewhere. When it comes time to finalize your document, you'll want to overwrite the rounded numbers with the actual numbers. I leave this for last because I often play with the numbers repeatedly, while working out the pattern. Once you update the numbers with actual numbers, you'll want to make sure you set up that area to calculate against itself, not against the raw numbers. The raw numbers are just there for reference.
For instance, in the example above, I'd change the rounded 83 to just 83, the rounded 4, to just 4, and then calculate the total number of stitches with a formula that subtracted double the decreases from the number of live stitches, which would give me the correct value.
Conclusion
It may seem a little overwhelming to follow this tutorial, but I think if you slowly build yourself up to using spreadsheets for your pattern planning, you'll find it really helpful. Feel free to play around with the sample I'm providing you. I don't know that all the calculations are 100%, but you'll get an idea of how to use it. Start small and keep experiementing. You can even manually fill in each section and just use Excel as a means to organize your data. One great way to learn more is to try user Excel to plot an existing pattern that either you or someone else created. You know your gauge and the measurements, so see if you can get the proper cast on, shaping and bind offs.
And, if you want to be really impressed, check out what a Master can do with Excel






![[calpremiere.jpg]](https://blogger.googleusercontent.com/img/b/R29vZ2xl/AVvXsEiy0wh_95AcwniXEoBtZoHC2yUGJ2XuU8O_-D10FxvaeOSiaAAZM1J1JUHI-8zfGrMG6XFuO6WtsDA4bnq_jySFC87TnR_W_sP1M8F3Qm7KH-Rd4DMFp-C4FxTnvsq5uT1cptxd-XgQHng/s1600/calpremiere.jpg)
![[calpremieremove.gif]](https://blogger.googleusercontent.com/img/b/R29vZ2xl/AVvXsEjp5NGvZgOE3ghqG0Ksh0c6lFPEO_0hIHk4O2P5pWZ0wWdFS4L7lVQCH-6GkDPyynDaflFO1bc7V2YGCat9AKdSoPMgef2GrBPfe_b6l-llR-Ls7M-2KzYlwBBU_ehpWtIBFM6cdbKlA84/s1600/calpremieremove.gif)